At first glance, the mop seemed beyond saving—its fibers clumped together, its color dulled, and an unpleasant odor lingering no matter how much it was rinsed.
Yet, what many people don’t realize is that a mop that appears worn out may not actually be at the end of its life. Hidden within those tangled strands are materials that can often be revived with the right cleaning approach.
The real question isn’t whether the mop is usable anymore, but whether the buildup inside it is preventing it from performing at its best.
How to Refresh a Dirty Mop and Make It Look Like New Again
A mop is one of the most essential cleaning tools in any household.
It removes dust, spills, stains, and everyday grime from floors, helping maintain a clean and hygienic living environment. Kitchens, bathrooms, living spaces, and hallways all benefit from a well-maintained mop. Despite its importance, the mop itself is often neglected when it comes to care and cleaning.
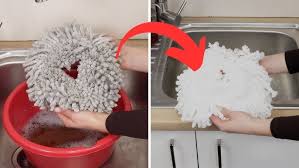
Many people assume that once a mop becomes visibly dirty or develops an unpleasant odor, it has reached the end of its usefulness and should be replaced. While mop fibers do wear down over time, most dirty mops can be effectively cleaned and restored with simple, accessible methods. Proper maintenance not only improves cleaning performance but also extends the mop’s lifespan, saving both money and resources while reducing waste.
Why Cleaning Your Mop Is Important
Using a dirty mop repeatedly can do more harm than good. Instead of removing dirt and bacteria from floors, an unclean mop may redistribute contaminants across surfaces. Over time, this can lead to unpleasant odors, streaks, and a general reduction in cleaning efficiency.
Regular cleaning ensures that:
Dirt and residue do not accumulate within the fibers
Unpleasant odors are eliminated
The mop remains effective in picking up debris
Hygiene is maintained across all cleaned surfaces
Ideally, a mop should be rinsed and cleaned after every use, particularly if it has been used with cleaning chemicals or on heavily soiled floors. Even with routine care, however, deeper cleaning is necessary periodically to remove stubborn buildup trapped within the fibers.
Signs That Your Mop Needs Cleaning
A mop may not always look obviously dirty at first glance, but several indicators suggest it requires a thorough cleaning:
Lingering unpleasant smell even after rinsing
Discoloration or dull appearance of the fibers
Reduced ability to absorb water or clean effectively
Sticky, clumped, or matted fibers
Residue being left behind on floors after mopping
When these signs appear, it’s time to perform a deep clean to restore the mop’s efficiency and longevity.
Should You Replace or Clean Your Mop?
Before deciding to replace a mop, it’s important to assess its condition. Many mops are discarded prematurely while still usable. Replacement is truly necessary only when:
The mop fibers are severely frayed or falling apart
The mop head is permanently damaged
The handle or attachment mechanism is broken beyond repair
If the mop is structurally intact, cleaning it is usually the more practical option. With the right approach, even a heavily used mop can often be returned to near-new condition.
Using Baking Soda for Deep Cleaning
Baking soda is one of the most effective and widely used methods for refreshing a mop. Its natural cleaning and deodorizing properties help break down buildup and neutralize odors trapped within mop fibers.
To clean a mop with baking soda:
Fill a bucket with warm water
Add approximately half a cup of baking soda
Stir until dissolved
Submerge the mop head and allow it to soak for a few hours
After soaking, rinse thoroughly under running water until it runs clear.
For an even deeper clean, some mop types can be washed in a washing machine. Adding baking soda to a wash cycle, along with detergent, can enhance cleaning, and using a higher temperature setting may help eliminate bacteria and stubborn buildup, depending on the mop material.
Cleaning with Vinegar
Vinegar is another effective household cleaning agent that removes residue and neutralizes odors.
To clean a mop with vinegar:
Mix equal parts warm water and white vinegar in a bucket
Soak the mop head for one to two hours
Rinse thoroughly afterward
Vinegar dissolves residues that normal rinsing cannot remove and leaves the mop feeling fresher. Its mild acidity makes it a safe and eco-friendly alternative to harsh chemical cleaners.
Using Lemon Juice for Freshness
Lemon juice can serve as both a natural cleaner and a deodorizer, leaving behind a light, fresh scent.
To use lemon juice:
Add freshly squeezed lemon juice to warm water
Soak the mop head for a set period
Rinse thoroughly afterward
The mild acidity of lemon juice helps break down dirt while providing a pleasant citrus fragrance, perfect for those who prefer natural cleaning methods without artificial scents.
Tea Tree Oil as a Cleaning Additive
Tea tree oil is valued for its aromatic and cleansing properties. While potent, a few drops can be added to enhance the cleaning solution.
To use tea tree oil:
Add a few drops to warm water
Combine with baking soda or vinegar if desired
Soak the mop head in the mixture
This not only contributes to cleaning but also helps maintain a fresher scent, making it a popular choice in natural cleaning routines.
Proper Rinsing and Drying Techniques
No matter which cleaning method is used, thorough rinsing is essential. Residual cleaning solution, dirt, or residue can impair mop performance and cause lingering odors.
After rinsing:
Squeeze out excess water
Hang the mop in a well-ventilated area
Allow it to dry completely before storing
Proper drying prevents mold, mildew, and unpleasant smells. Ensuring full dryness also helps preserve the mop’s condition and extends its usability.
How Often Should You Clean Your Mop?
The frequency of cleaning depends on usage. As a general guideline:
Rinse after every use
Deep clean every few uses or when odor appears
Wash more frequently if used in high-traffic or heavily soiled areas
Regular maintenance prevents buildup and reduces the need for intensive cleaning sessions.
Extending the Life of Your Mop
Proper care can significantly extend the lifespan of a mop. A few simple habits make a big difference:
Avoid excessive use of harsh chemicals that may damage fibers
Store the mop in a dry place to prevent moisture accumulation
Rinse thoroughly after each use to remove debris
Avoid leaving the mop sitting in dirty water for long periods
Inspect the mop regularly for wear and tear
Following these steps maintains hygiene and performance while reducing the need for frequent replacements.
Final Thoughts on Mop Maintenance
A mop is more than just a cleaning tool—it is an essential part of a healthy, tidy home. Its effectiveness depends heavily on proper care. Allowing dirt and residue to accumulate not only reduces efficiency but can counteract your cleaning efforts.
Restoring a dirty mop does not require expensive products or complicated procedures. Simple household items—baking soda, vinegar, lemon juice, and tea tree oil—can remove buildup, eliminate odors, and refresh fibers. With proper soaking, rinsing, and drying, even a heavily used mop can often be restored to near-new condition.
Incorporating regular cleaning and maintenance into your routine improves mop performance, ensures hygiene, and extends the tool’s life.
Taking a few extra minutes to care for your cleaning equipment ultimately leads to better results, a more efficient cleaning process, and a healthier home environment.